

Pre-requisites
- Three virtual machines in VMware Workstation or VirtualBox or cloud VM’s.
- Minimum 4 GB Ram And 2 Core CPUs on each node.
- The root password must be configured on each node.
My Cluster Information
| VM Domain Name | IP Address | OS |
| master.gurukul.com | 172.16.1.204 | Ubuntu 20.04 |
| worker1.gurukul.com | 172.16.1.205 | Ubuntu 20.04 |
| worker2.gurukul.com | 172.16.1.206 | Ubuntu 20.04 |
Steps For All Nodes
Update all three nodes:
#apt-get update -y
Disable swap and enable IP forwarding on all three nodes
#swapoff -a
Also, comment on the swap entry by editing the fstab file
#vi /etc/fstab

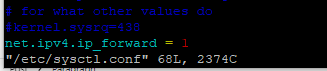
Disabling IP Forwardning by adding ‘net.ipv4.ip_forward = 1‘ line in the end of the file /etc/sysctl.conf.
#vi /etc/sysctl.conf
After adding the above line on all three, VMs run the below command
#sysctl -p
Install the Docker CE on all three VM’s
#apt-get install apt-transport-https ca-certificates curl software-properties-common -y
#curl -fsSL https://download.docker.com/linux/ubuntu/gpg | apt-key add –
#add-apt-repository “deb [arch=amd64] https://download.docker.com/linux/ubuntu $(lsb_release -cs) stable” #apt-get install docker-ce -y
Add Kubernetes repository to all the three VMs
#curl -s https://packages.cloud.google.com/apt/doc/apt-key.gpg | apt-key add
apt-add-repository “deb http://apt.kubernetes.io/ kubernetes-xenial main”
#apt-get update -y
#apt-get upgrade -y
Now install Kubernetes components(kubelet, kubeadm And kubectl) on all the VMs.
#apt-get install kubelet kubeadm kubectl -y
Now create a file under /etc/docker/daemon.json on all the VMs and place the below contents.
#vi /etc/docker/daemon.json
Paste the below contents in above created file.
{ “exec-opts”: [“native.cgroupdriver=systemd”],
“log-driver”: “json-file”,
“log-opts”:
{ “max-size”: “100m” },
“storage-driver”: “overlay2”
}
Start and enable the docker services on all the VMs.
#systemctl daemon-reload
#systemctl enable docker
#systemctl start docker
Steps For Master Node Only
Run the below commands only on the master node.
#kubeadm init –pod-network-cidr=10.244.0.0/16
In the above command no need to change anything. If everything goes fine you will get the result like below.
Your Kubernetes control-plane has initialized successfully!
To start using your cluster, you need to run the following as a regular user:
mkdir -p $HOME/.kube
sudo cp -i /etc/kubernetes/admin.conf $HOME/.kube/config
sudo chown $(id -u):$(id -g) $HOME/.kube/config
Alternatively, if you are the root user, you can run:
export KUBECONFIG=/etc/kubernetes/admin.conf
You should now deploy a pod network to the cluster.
Run “kubectl apply -f [podnetwork].yaml” with one of the options listed at:
https://kubernetes.io/docs/concepts/cluster-administration/addons/
Then you can join any number of worker nodes by running the following on each as root:
kubeadm join 172.16.1.204:6443 –token hkol1c.5fccm4rsnc8r6mgw \
–discovery-token-ca-cert-hash sha256:00fe1fa010686e81291eb157113240faa3f88a3fd9685773f4ad4b562708f87d
From the above output save the complete join command.
Before proceeding further we need to do some more steps so first export the kubernetes configuration by using the below command.
# export KUBECONFIG=/etc/kubernetes/admin.conf
Now we need to create a pod network by using the below command.
#kubectl apply -f https://raw.githubusercontent.com/coreos/flannel/master/Documentation/kube-flannel.yml
#kubectl apply -f https://raw.githubusercontent.com/coreos/flannel/master/Documentation/k8s-manifests/kube-flannel-rbac.yml
Wait for some and your master will be ready. Run the below command to verify the pod’s status.
#kubectl get pods –all-namespace
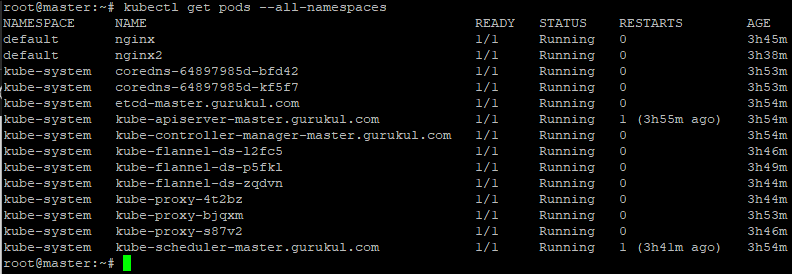
In the above output if all the pods are in the running stage then it’s time to configure the worker for this master node.
Join Worker Nodes With Kubernetes Master Node
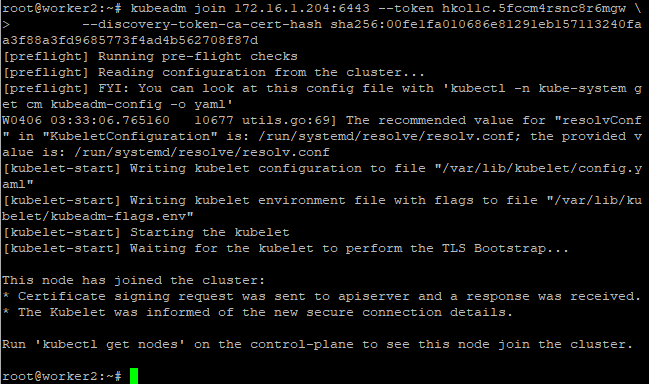
Copy the join command that you have saved earlier. Now log in to both worker nodes and run the command that you have copied.
#kubeadm join 172.16.1.204:6443 –token hkol1c.5fccm4rsnc8r6mgw \
–discovery-token-ca-cert-hash sha256:00fe1fa010686e81291eb157113240faa3f88a3fd9685773f4ad4b562708f87d
The output of the above command looks like this:
Now go to master node and run ‘kubectl get nodes’ you will get both the worker node. If you want to add more nodes just run the join command on that new VM it will be automatically joined with the master node.
#kubectl get nodes

I have bookmarked it in my google bookmarks to visit then. visit here https://kbcjiolotterywinnerlist.info/kbc-rana-pratap-singh-kbc-lottery-manager/
After following these steps successfully created
Very Nice. To the point configuration. Keep it up
Wonderful views on that!
Good One
Why is it I always really feel like you do?
I was just telling my friend about that.
That’s very good point