

Node Tents
Taint is a property that we can apply only to a cluster node.
In simple terms, If we apply taint to a node it will create a restriction around the node which will prevent the pods to schedule inside that node.
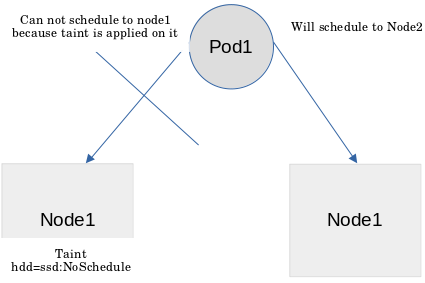
Suppose you have two nodes, one is the master and the second is a worker. Now, whenever you will create a pod it will schedule in the worker node. Why?
Because master is tainted with the NoSchedule effect by default so, no pod gets scheduled into it.
How To Taint A Node
kubectl taint node worker1.example.com hdd=ssd:NoSchedule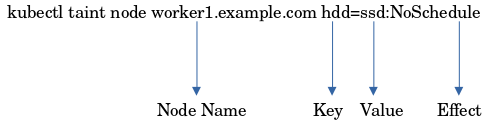
Taint Effects
1. NoSchedule: If we apply this taint effect to any node, It will only allow the pods which have a toleration effect equal to NoSchedule.
But if any pod is already running in a node and then you apply the NoSchedule taint effect, Then the pod will remain running in the pod.
2. PreferNoSchedule: It will first prefer for NoSchedule of the pod but if you have a single node with PreferNoSchedule taint then even if the pod did not tolerate the taint it will get scheduled inside the node which has taint effect PreferNoSchedule.
3. NoExecute: This will also restrict the pod for scheduling but also if a pod already running in a node where we have applied the taint with NoExecute effect it will kick out that pod as well.
Pod Toleration
As we know that the node taints will restrict the pod from scheduling in it. So in order to prevent this, Kubernetes provides a concept of pod toleration. Through this, the pod has the authority to get scheduled on the tainted node, if the toleration matches the node taint. Toleration is always specified in the pod spec.
apiVersion: apps/v1
kind: Pod
metadata:
  name: Pod-Toleration
spec:
  containers:
  - name: nginx-Toleration-test
    image: nginx
    ports:
    - containerPort: 80
  tolerations:
  - key: hdd
    operator: "Equal"
    value: ssd
    effect: NoSchedule
Look at the above Pod configuration, you will see a toleration block under spec and inside that, you will find some keywords, Like:
key: Key is the value that you have specified while applying node taint. Ex: hdd
value: value that you have specified while applying node taint. Ex: ssd
effect: that you have specified while applying node taint. Ex: NoSchedule
operator: There are two values that we can use under the operator keyword.
- Equal: We have to specify all the key, value, and effect options by using this operator. Like above.
- Exists: In this operator, we do not need to mention key, value, and effect options. If you want to allow your pod to tolerate every node taint then under the pod toleration, we have to mention the
operator: "Exists". By using this your pod will tolerate all the taint nodes.
Now think about a situation, what if we have a number of worker nodes, can we assure that our pod will get scheduled in a specific node?
Yes, we can also assure that our pods get scheduled in a specific node by using the NodeSelector inside the pod specs. We just need to mention the node label in which we want to schedule it.
kubectl label node worker1 hdd=ssd
Below is the pod configuration to deploy a pod in the worker node in which we have labeled hdd=ssd.
apiVersion: apps/v1
kind: Pod
metadata:
  name: NodeSeletector_example
spec:
  containers:
  - name: nginx-container
    image: nginx
    ports:
    - containerPort: 80
  tolerations:
  - key: hdd
    operator: "Equal"
    value: hdd
    effect: NoExecute
  nodeSelector:
    hdd: ssd
Questions For Prectice:
Taint your first worker node with env=stg, second worker with env=prod. Also label the worker1 with stg env and worker2 with prod env. Now try to deploy a pod on both the worker nodes.
For any queries, do not forget to comment.